When you look at a lacrosse field, you see different lines and boxes that add structure to the flow of the play and dedicate the space that players can utilize to their advantage. In particular, goal line extended in lacrosse is a very important line both offensive and defensive players need to understand and be comfortable with.
There are two primary reasons why players must learn the meaning of goal line extended and how to use it properly.
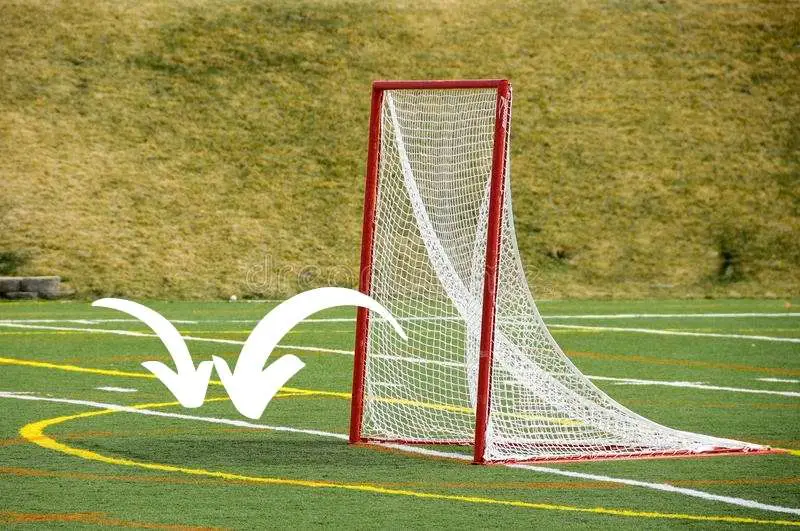
First, let’s define where the goal line extended, or GLE, is. It’s easiest to visualize the goal line extended to be a line between the pipes that runs parallel to the end line and extends out to the sidelines. Since it’s the line where the front of the goal sits, it serves as the boundary for coaches to define as topside. If an offensive player can cross this line from behind the goal s/he can get a quality side shot at the goal. In addition, goal line extended is used as the restarting position after a penalty call. And the offensive team will often plant a feeder near the GLE as part of the settled offensive play.
Now with a basic understanding of the GLE, in the next few sections, we are going to go in-depth on how GLE plays in both the offensive and defensive scenarios.
Read also: How big is a lacrosse field
How to play around GLE
As you work your way around goal line extended, the defender will try to push you back toward the end line. You could use brute force to outcompete him but most of the time it will not work and you could even injure yourself. Therefore what the best shooters do is to use dodges at GLE to get away and use sidearm to shoot at the goal. By using counter-defensive tendencies, you could use these effective moves to beat defense and create scoring opportunities.
There are two dodges you could utilize at GLE
Z-Dodge
As the name sounds, this dodge involves sharp angles and zigzag pattern. It’s especially useful when you want to make an overaggressive defender off balance. Here’s how it works: as the defender pushes you at GLE, you also want to give him a push to create separation. At the same time, place your hands on the stick in a passing position to fake a pass.
Since he will throw himself toward you to stop the pass, you then perform the dodge. After re-attacking, you might need to perform another dodge to skip past sliding defenders. Once you get open, quickly transition to shooting hand placement to attempt a shot.
Watch this clip to learn it in action
S-Dodge
In contrast to Z-dodge, S-dodge involves a more curvy and subtle fashion. As you come up to the top of GLE, go wide to the side so you don’t draw additional defenders. As he pushes you back at GLE, do a roll back behind the goal and switch hands.
As now you crossed the topside and are able to feed to teammates, you want to keep cradling with two hands. At this point the defender recovers to get on your hands; you dodge and change direction again with one hand. Once you have a step on your defender, get in front of him and attempt to shoot.
I found this great video that explains how to dodge from behind the goal very well. The biggest takeaway is you want to dodge and cross the topside within five steps to each side of the pipe to become a threat. Otherwise, you will be too far to attempt a shot or feed to your teammate.
To learn more about dodging, check out this post: How to play dodge in lacrosse
Defend at GLE
Now it’s time to walk through how defenders can prevent shooters from crossing the topside and get a chance at shooting the goal. The key in defending around GLE is to find the balance between when to push and when to pull.
So as the shooter starts to run up from X toward GLE, you need to be ready to defend him by squaring up, bending your knee and engaging your core. This serves as a cushion as the attacker will accumulate good momentum to push you topside. Instead, you need to match up to his momentum and ideally get to stop him at GLE. If you engage him too high, he will easily dodge and get past you.
Once you are on him at GLE, stay inside him and use the crease to turn him away from the goal. This is called “closing the gate”. Think of your defending path/arc similar to a door closing. As the shooter tries to roll dodge, you want to swing your hip and follow your feet to change from an inside angle to an outside angle on the shooter. Throughout the whole process, you want to stay low and drive him out and then back to X without leaving space for a dodge.
Remember when defending around GLE, always use the crease to your advantage.
To successfully deliver defense around GLE, you want to constantly improve your strength, agility and physicality. So I highly recommend you start doing these workout drills that target specific defensive skills.
Conclusion
As we wrap up our discussion of GLE, it’s very important to recognize all the techniques and skills you learn will come in handy when shooting or blocking. GLE plays an important role in the team’s offensive strategy so definitely make sure you incorporate this into your daily practice.